Zero Trust on Kubernetes: Securing Microservices With Istio MTLS and Keycloak
 Angel Azuara Eizaguirre included in Personal Projects
Have you ever wondered how to handle user authentication by delegating it to an Identity Provider (IdP), and how to secure communication between your microservices without having to implement that logic yourself? That’s exactly what we’re going to look at in this article.
The motivation for this post comes from the need to address some of the limitations of my bachelor’s thesis. The two main shortcomings were user authentication, which was handled manually by generating a JWT, and the lack of HTTPS in communication between microservices. In this new project we solve both: we delegate authentication to a real IdP, and we secure internal communications with mTLS transparently at the application level.
To do this we use a free IdP, Keycloak, to manage user access, and Istio as a service mesh. At a high level, Istio deploys an Envoy proxy as a sidecar in each pod, which intercepts incoming and outgoing traffic and automatically encrypts it via mTLS, without your microservices code having to know anything about it.
1 Overview
For this project, a small e-commerce app based on microservices was designed as the use case. The application doesn’t use data persistence and its logic is deliberately simple, since the main goal of the project isn’t to build a complete e-commerce application, but to use a simple example to focus on authentication mechanisms and secure communication between services.
The application is made up of three main microservices: an API Gateway, a products service (products), and an orders service (orders). The API Gateway acts as the entry point to the application and is responsible for routing requests to the corresponding microservices. It’s also responsible for managing the user authentication flow, as we’ll see later in the section on the OAuth flow.
The products microservice keeps a simple product catalog in memory and allows querying the available products. The orders microservice, in turn, allows creating and querying orders.
Once the user is authenticated, the API Gateway validates their credentials and forwards requests to the corresponding microservice. Communication between these takes place through the Istio service mesh, which provides mutual authentication via mTLS between the application’s different components. This way, the security of communications is decoupled from the microservices business logic.
On the microservices side, we’ll only stop to analyze the code flow related to authentication and interaction with the IdP. The rest of the implementation can be found in the GitHub repository.
The infrastructure used to support the deployment consists of a local Kubernetes cluster created with Kind. Although the project could be deployed to a cloud environment with some modifications to the infrastructure, using a specific cloud provider isn’t relevant for the goals of this article. Using a local cluster lets us focus on the fundamental concepts of Keycloak, OAuth 2.0, Istio, and mTLS without introducing extra complexity tied to a cloud provider.
Throughout the article we’ll see how these components fit together, from the user authentication flow to internal communication between microservices, and how these responsibilities can be delegated to specialized components without having to manually implement security within each service.
2 Authorization Code OAuth Flow
OAuth 2.0 is a standard designed so that applications can obtain authorized access to protected resources on behalf of a user or service. There are several flows, such as client credentials or authorization code (with and without PKCE), which is the one we’ll focus on in this article.
In the authorization code grant flow, the authorization server returns a single-use code, which is exchanged for an access token. When PKCE is added to the flow, a series of extra steps are introduced when obtaining the token, so that even if the authorization code is intercepted by an attacker, they can’t exchange it for an access token in place of the user who requested it.
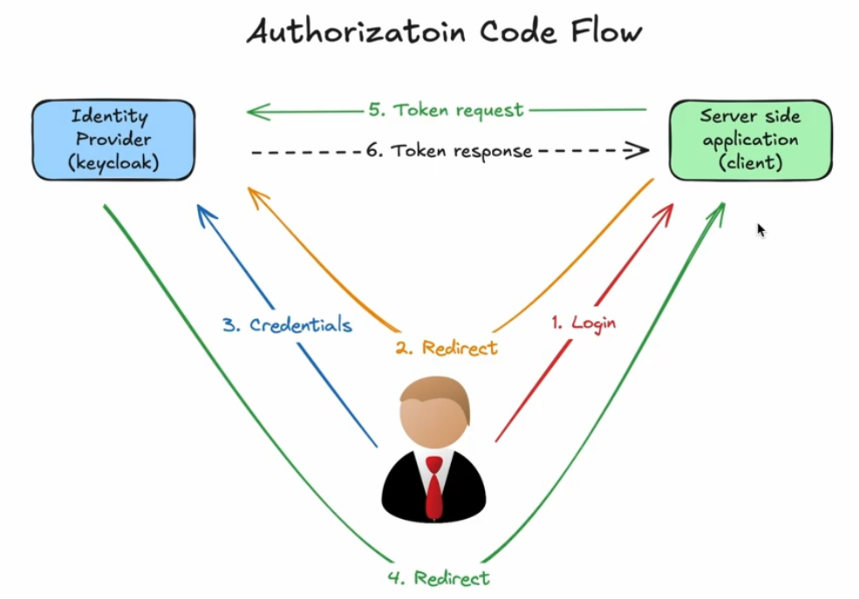
As shown in the image, the flow works as follows:
- The user logs in to the application (which is a client of the IdP).
- The application redirects the user to the IdP, in this case Keycloak, where they must enter their credentials.
- The user enters their credentials at the IdP.
- The IdP redirects the user to an endpoint of the client application, such as
/callback, leaving the code and state in the URI under thecodeandstatekeys. - The client application extracts that code from the URI and uses it to request a token.
- If everything went well, the IdP responds with the access token for the user.
When adding PKCE to this flow, what happens is that before redirecting the user to the IdP to log in, a state, a code verifier, and a code challenge are generated. Basically, the state and code verifier are random byte strings, while the code challenge is the hash of the verifier. Along with the authorization URL we send the code challenge and the hashing algorithm used, so that if someone captured the authorization code, they wouldn’t be able to redeem it.
2.1 Keycloak
As mentioned at the start of this post, Keycloak is an open-source Identity Provider that lets us centralize our application’s authentication, authorization, and user management, decoupling security from the business logic.
We’ve just seen its role in the OAuth flow in the previous section, but there’s more. Within a realm (an isolated management space, useful for separating different environments or applications), we can define clients (the application), the users who can authenticate, the roles assigned to those users, as well as login options, email verification, password recovery, among others.
2.2 Implementation
Now you’re probably wondering: how is all of this implemented? Well, first of all, from the API we expose the following endpoints:
| |
The first one is what we use to log in, the second is where the IdP redirects us once we’ve entered the user credentials and where it leaves us the authorization code and state, and the third is where the application leaves us once it has exchanged the code for a token and set it as a cookie. In this third endpoint we also show relevant user information to verify that it worked.
Now that we have this, let’s go to the Keycloak interface; in my case, since everything is deployed on a local cluster, I do a port-forward of the service to access it.
| |
All manifests can be found in the GitHub repository. For deploying Keycloak we used a Postgres database with a persistent volume to store the information.
Once we’ve logged in, let’s create a realm; to do this we go to the tab labeled Manage realms and click create. Once created, we select it and create a client. To do this we go to the Clients tab and click create, give it whatever name we want in Client ID, in this case oidc-client, and check the following options:
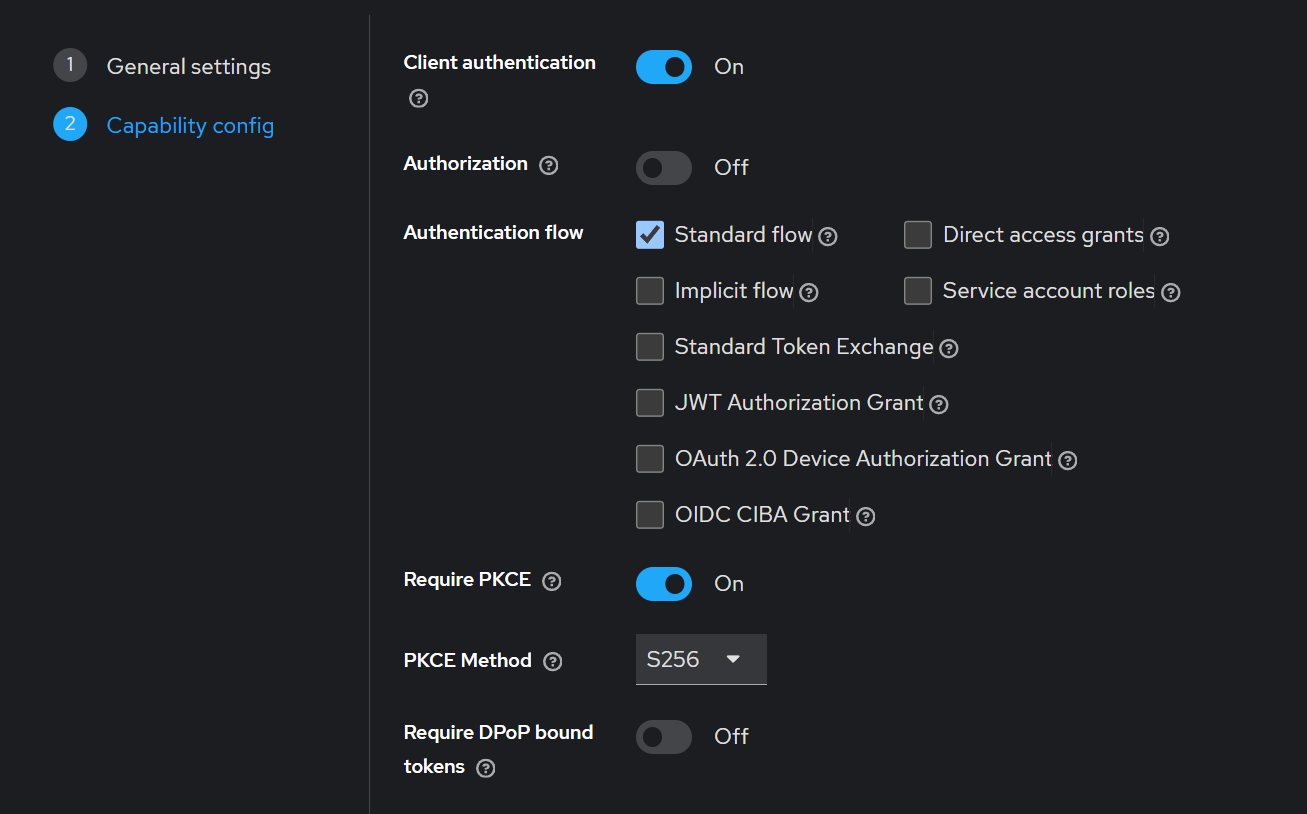
The PKCE checkbox could be left unchecked, but this way we force an error if the parameters aren’t received.
Finally, we set the callback endpoint as the redirect URL:
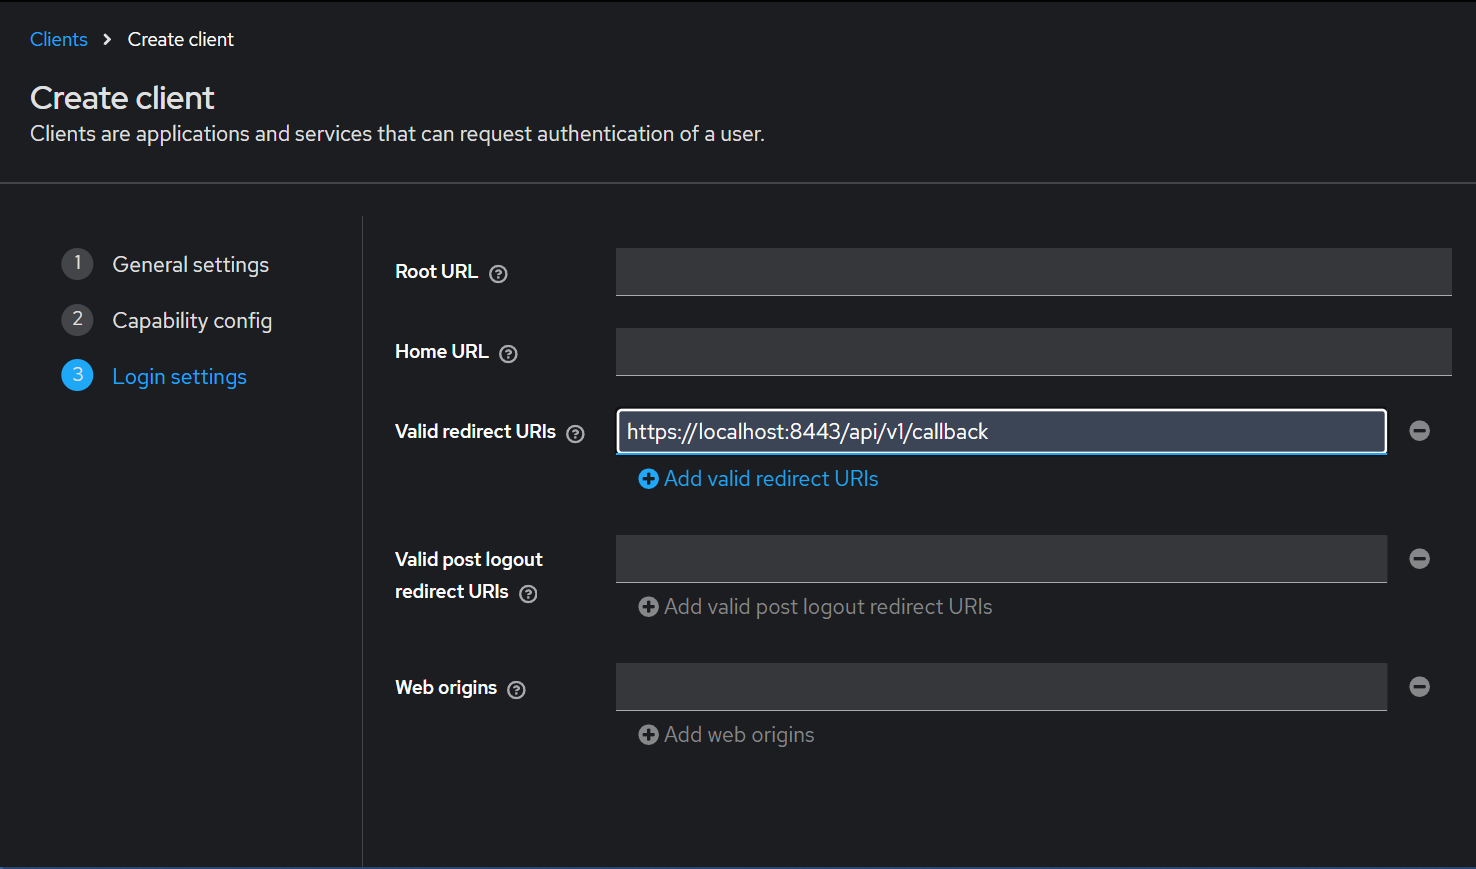
We don’t yet have the Istio gateway implemented for HTTPS, so we should use port
9090, which is the port the API runs on, instead of port8443.
Now let’s create the test user (you can also create the user by registering directly). To do this, we go to Users and click Add User; we give it a name and, once created, on the Credentials tab, we set a password (unchecking the Temporary box).
We can additionally enable some login options such as the following:
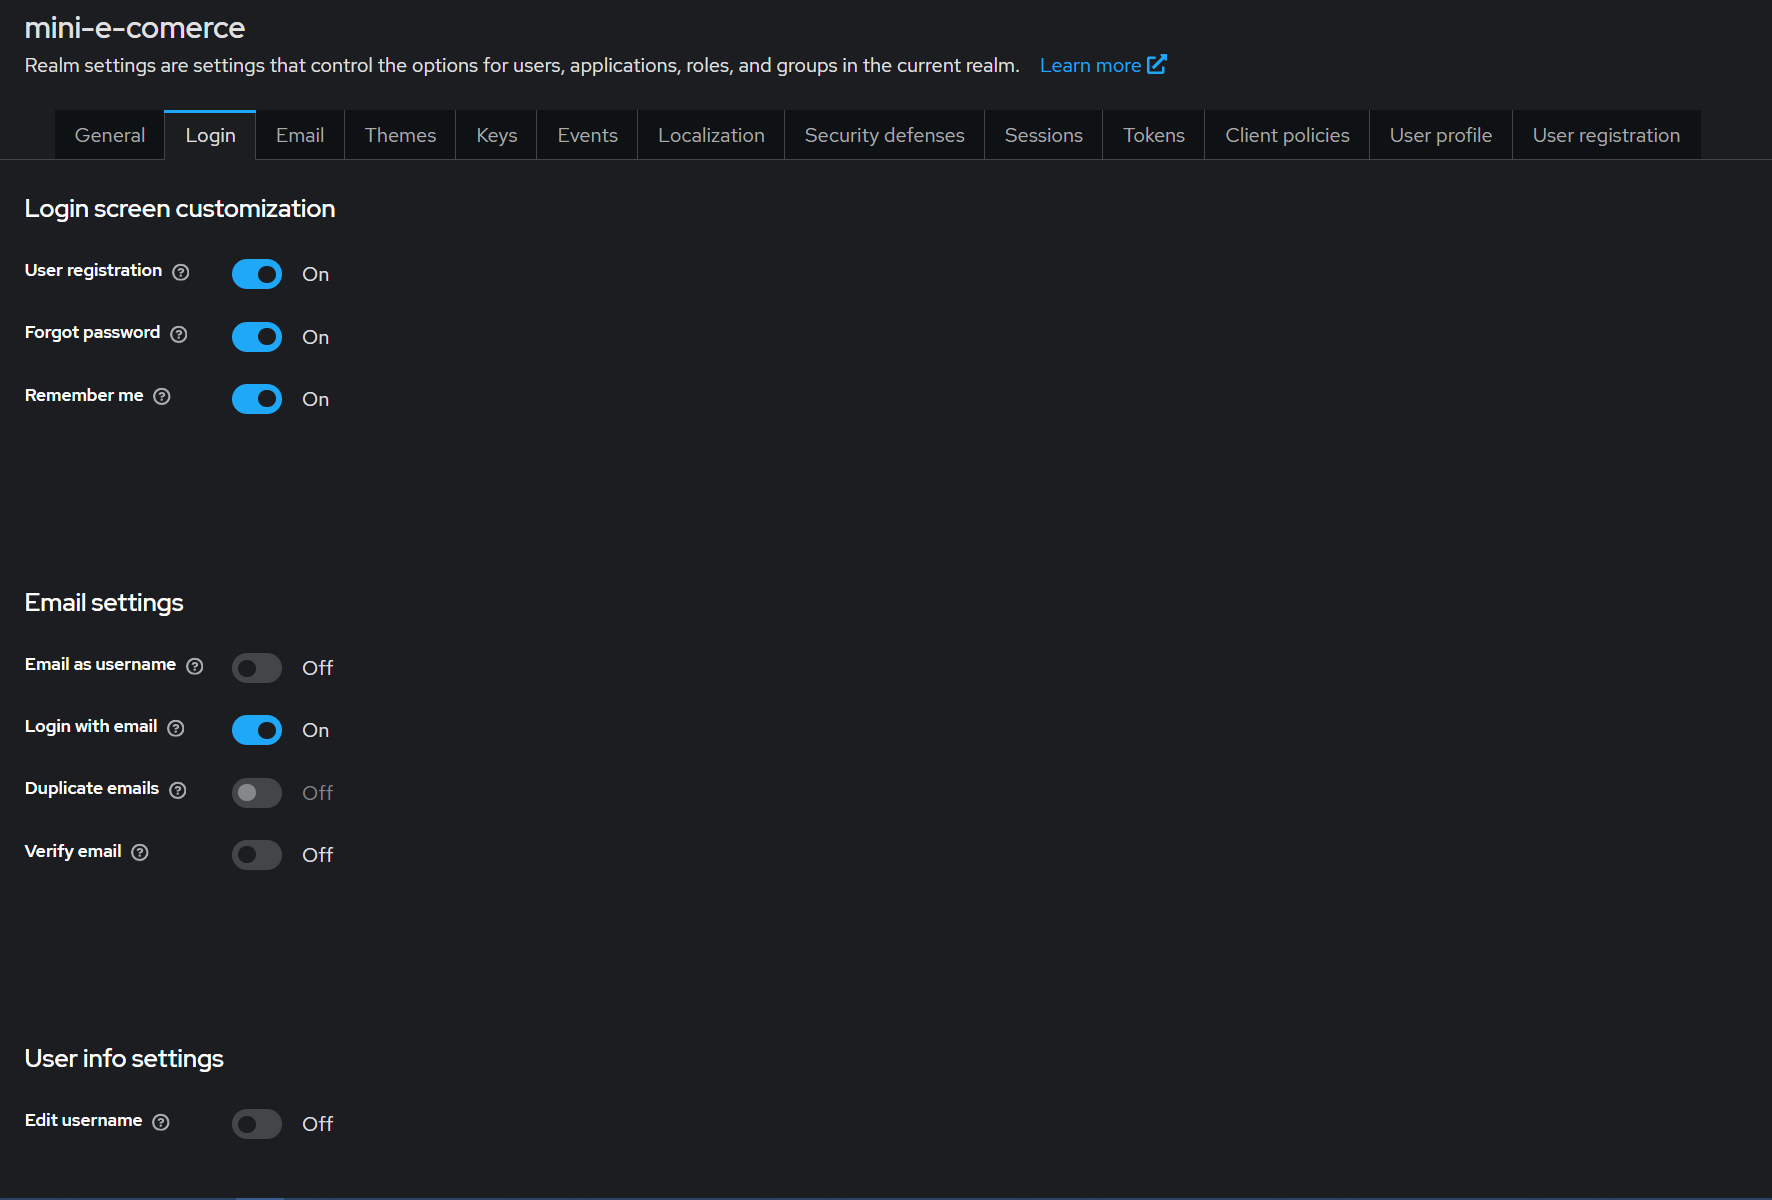
Finally, I created a role to demonstrate its functionality. This can be done from Realm roles, where we give it a name; in this case, we assign it to the user we created.
With that done, we’re finished with Keycloak. Now it’s time to configure the API: for that we create the handlers for the endpoints shown earlier, and the middleware to verify that the user is authenticated and authorized.
As for the handlers, first we create the struct with the client information.
| |
The
AuthURLuseslocalhostbecause it’s visited by the user’s browser, which can’t resolve Kubernetes’ internal DNS (keycloak-svc). TheTokenURL, on the other hand, useskeycloak-svcbecause that call is made directly by theapi-gatewayitself, running inside the cluster, which does resolve that name via internal DNS. Again, since Istio isn’t implemented yet here, we should replace port8443with9090.
Then we declare the following helper functions that we’ll use for PKCE:
| |
The first one generates the random byte string in hexadecimal, while the second creates the AuthURL, with the state, the codeVerifier, and the codeChallenge hashed using S256, as we specified earlier to Keycloak.
Now, from the login handler, we save this struct using a mutex (to check the returned values later), and redirect the user to the AuthURL.
| |
And in the callback handler we extract the state and code from the URL, validate them (checking that the code isn’t empty and that the states match), and exchange the code for an access token, which we’ll set as a cookie, redirecting to the /me endpoint shown earlier.
| |
As for the middleware, we have two functions that run before accessing the protected endpoints. The first one extracts the access token from the cookie, validates it, and adds the token’s claims to the context:
| |
The second one validates the roles. As an illustrative example, a role called customer was created and assigned to the user, and with this function we simply check whether it’s among the user’s roles. It’s very simple logic, but it lets us see how you can work with roles.
| |
With this, the application’s security layer is now implemented. As we can see, only a couple of functions are needed to apply the OAuth flow, and in exchange it gives us great advantages.
3 Service Mesh
According to Red Hat, a service mesh is an infrastructure layer that, within an application, handles communication between services. Some of its functions are traffic routing and security.
It can be considered a microservices architecture pattern. As the number of microservices grows, communication becomes harder to manage through code; this is where the service mesh comes into play. It integrates into the application as a set of network proxies that act as intermediaries in communication between services. In this context, each service has its own proxy, which runs as a sidecar within the same pod, intercepting all incoming and outgoing traffic to transparently apply security policies (such as mTLS), routing, and observability, without the application code having to implement them. In our case, we’ll use Istio as the service mesh implementation, and Envoy as the proxy deployed in each sidecar.
3.1 Istio and Envoy
As we just mentioned, Istio and Envoy are the solutions we’re going to implement. Istio is the service mesh itself; its architecture has a control plane (called istiod) that manages and configures the proxies to route traffic, and a data plane, made up of a set of Envoys, the proxy deployed as a sidecar in each pod, which control all network communication between microservices, and which also collect and report telemetry data on all network traffic.
For a pod to automatically receive its Envoy sidecar, it’s enough to label the namespace it lives in with istio-injection=enabled, and from then on, any new pod deployed there will receive the proxy injected alongside its main container.
In this project we’ll use two specific Istio pieces to strengthen security between microservices: PeerAuthentication, which forces all internal traffic to be encrypted with mTLS, and AuthorizationPolicy, which lets us restrict which services can communicate with each other (for example, that only apigw can call order-service), based on each service’s cryptographic identity, not its IP address.
4 Deployment and Configuration
With all that said, let’s move on to implementing the service mesh for securing communication between microservices. First of all we need to install Istio; we can follow the steps in the documentation. Once we have istioctl installed, we install it on the cluster. To do this we run:
| |
demois one of the predefined installation profiles ofisitoctl
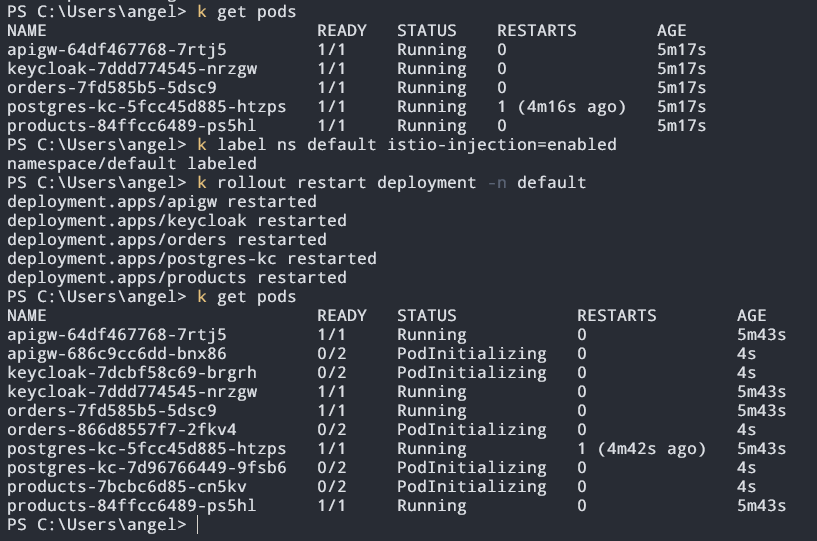
And as mentioned before, for the sidecar to be deployed in the application’s pods, we apply the istio-injection=enabled label to the namespace and restart the deployments:
| |
As we can see in the following image, we now have 2 containers per pod, one running the microservice’s image, and another that is the sidecar with the Envoy proxy.
With this we’d already have mTLS “available” in PERMISSIVE mode, but to force all traffic to be encrypted, we deploy a PeerAuthentication manifest that makes mTLS strict in the communication:
| |
We can take the opportunity to install the Istio add-ons that come in the installation folder and that we’ll look at next, in the Add-ons section. To do this we run:
| |
Finally, we still need to implement TLS from the outside, and this is where we use the Istio gateway. To do this, we have to configure it:
First, let’s create a self-signed certificate, since in this development scenario we don’t need an authority to validate it. We also generate the private key without a password.
| |
Once we have these two files, we create a TLS-type secret with them, which will be passed to the Istio gateway.
| |
Now we need two manifests: the first to configure the Gateway, and the second, a VirtualService that routes the received traffic to our API.
It’s important to understand that the Gateway resource doesn’t deploy any new proxy — it’s declarative configuration applied on top of the Envoy proxy of the Ingress Gateway that was already installed together with Istio (identified via the selector). In it we specify the port and protocol we want to expose (HTTPS on port 443), and the TLS secret from which Envoy should read the certificate.
| |
The
hostsfield accepts a wildcard (*) in development, since we don’t have a real domain; in production, the specific domain of the application would be specified.
On its own, the Gateway doesn’t know where to send the traffic it accepts; that’s defined by the VirtualService, which routes incoming requests to our API’s Service within the cluster.
| |
Now, to test that everything works, let’s log in with the user we created and extract the cookie (the access token).
To do this, we expose the Istio Gateway:
| |
And now, directly in the browser, we go to the authentication endpoint, that is, https://localhost:8443/api/v1/authentication.
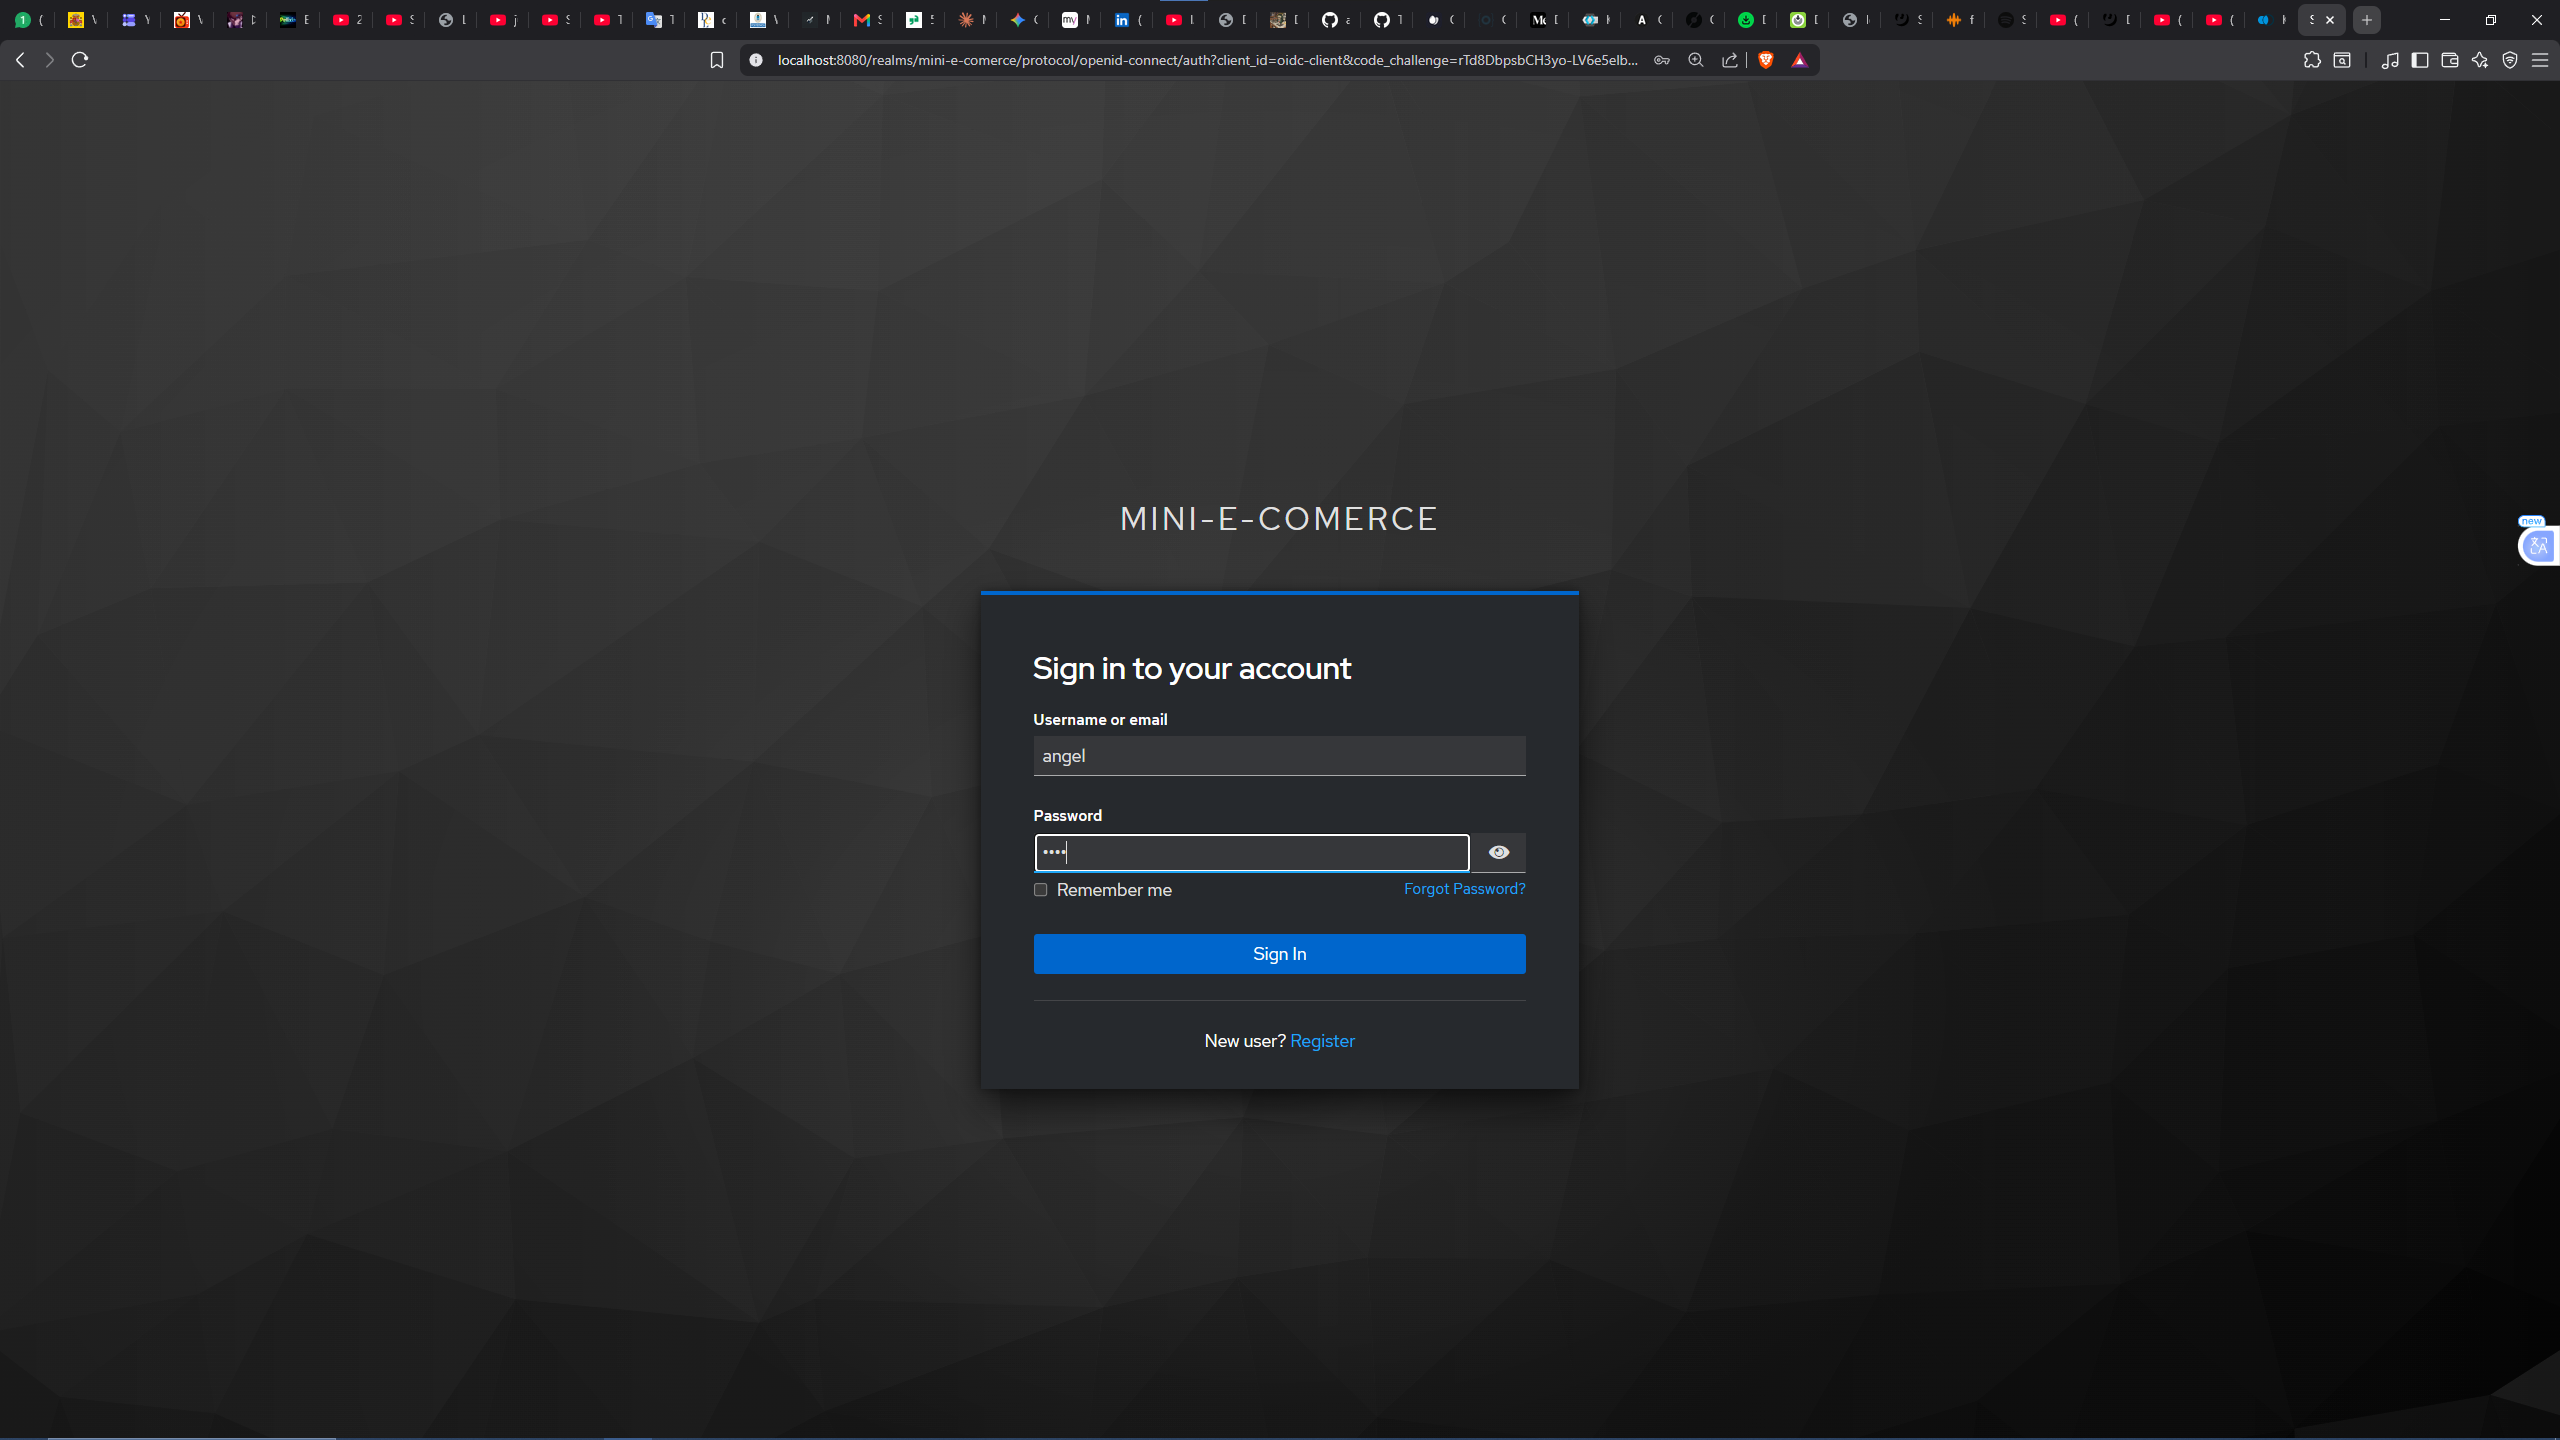
Note that Keycloak is still exposed via port-forward.
This redirects us to the login tab.
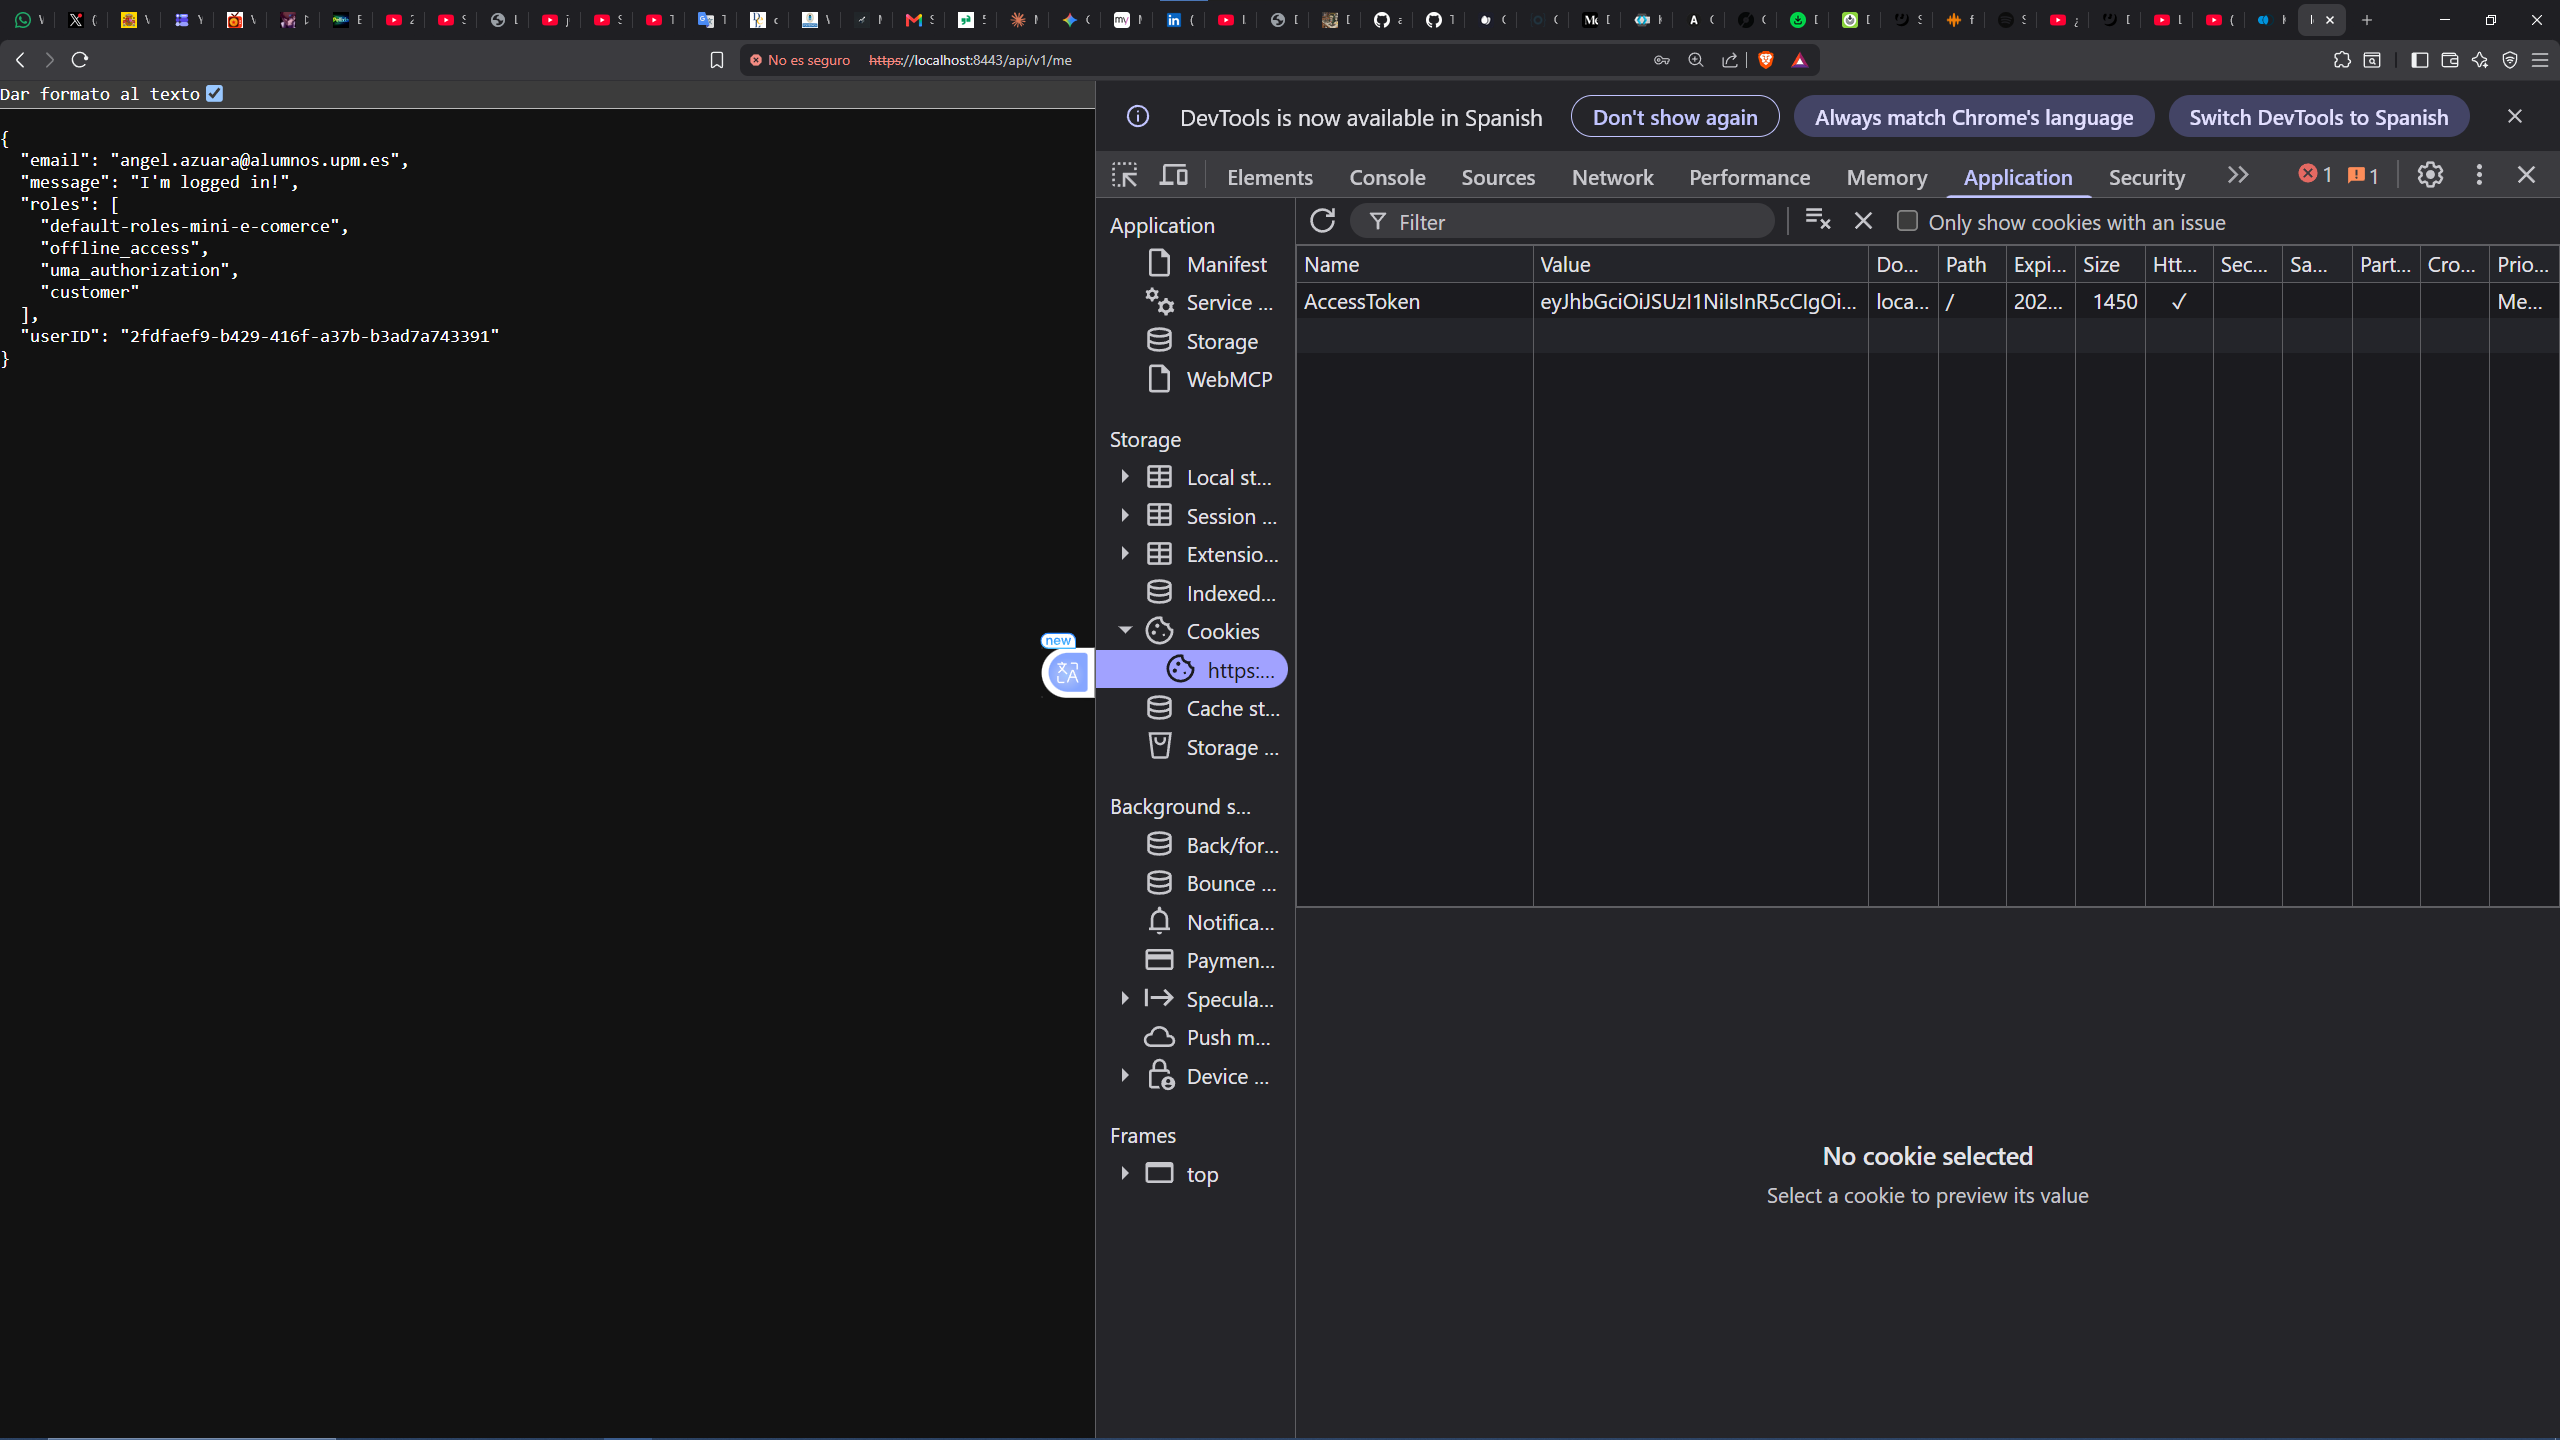
Once the credentials are entered, we’re redirected to the callback, which in turn redirects us to https://localhost:8443/api/v1/me, where user information is shown. If we open the developer tools, we can see the cookie with the access token in the Application tab, and we can extract it to make the other requests from a tool like Postman or Bruno.
5 Add-ons
Before moving on to testing the endpoints, it’s worth pausing to take a high-level look at the add-ons Istio provides us with. This section could be a post of its own, so we’ll just cover the most notable ones.
In this local scenario, to test them, besides having them deployed (remember that Istio’s
demoprofile installs them automatically), we need to expose each resource’s Service withport-forward.
5.1 Kiali
Kiali is the console for the Istio service mesh. It lets us configure, visualize, and troubleshoot.
Some of its functions are as follows:
First of all, it gives us an overview of the clusters where Istio is running.
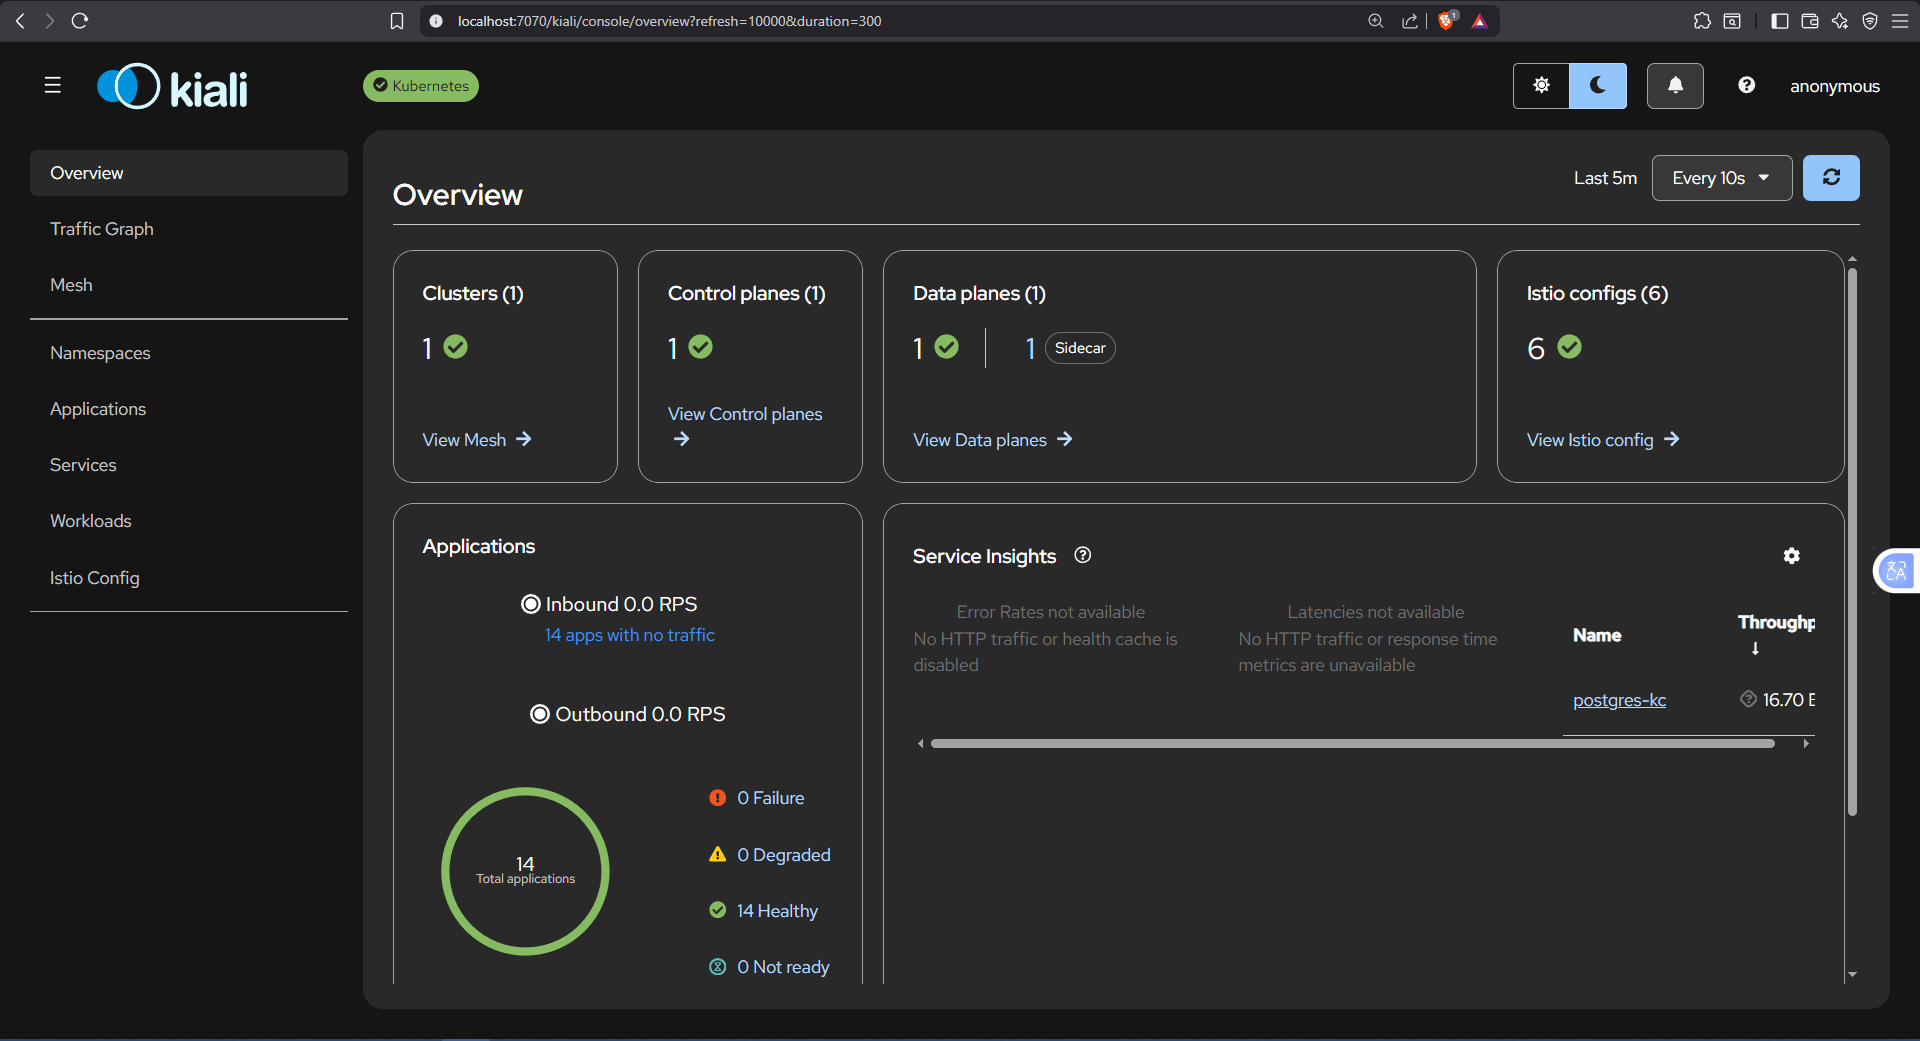
If we go to the
Traffic Graphtab, it shows us a graph of how traffic flows within our application in real time (for a service to appear here, its Deployment needs theapp: <name>label).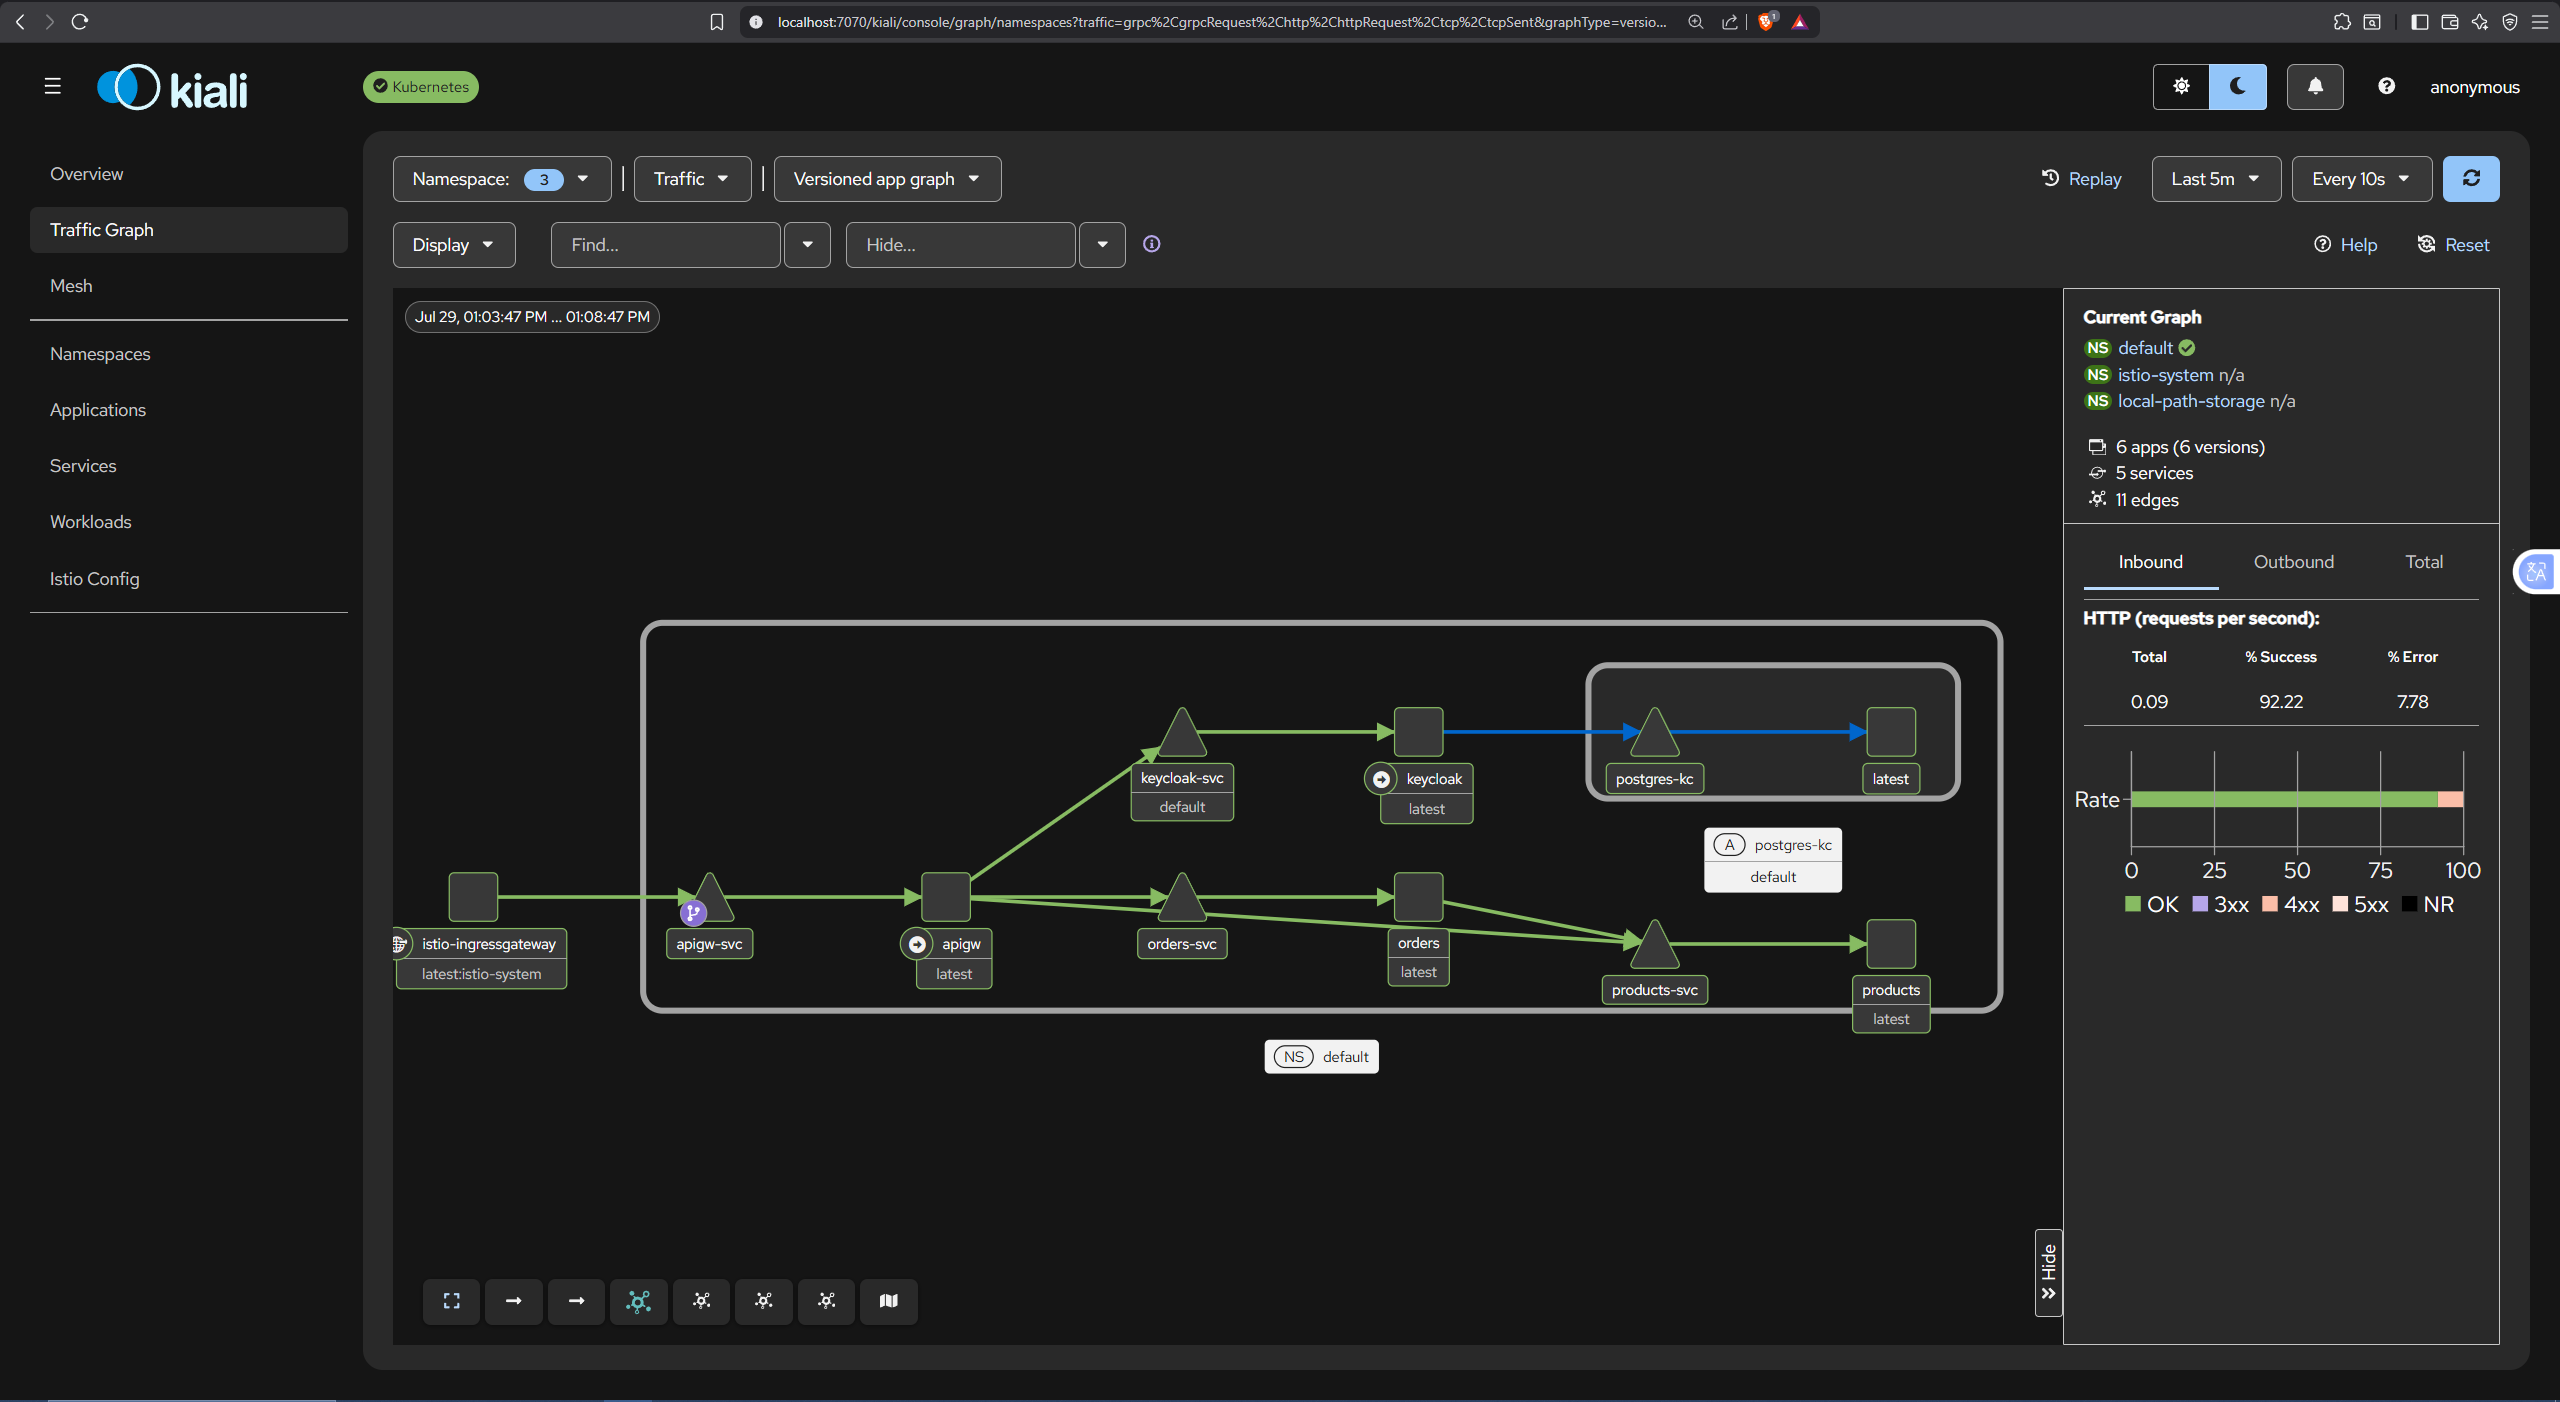
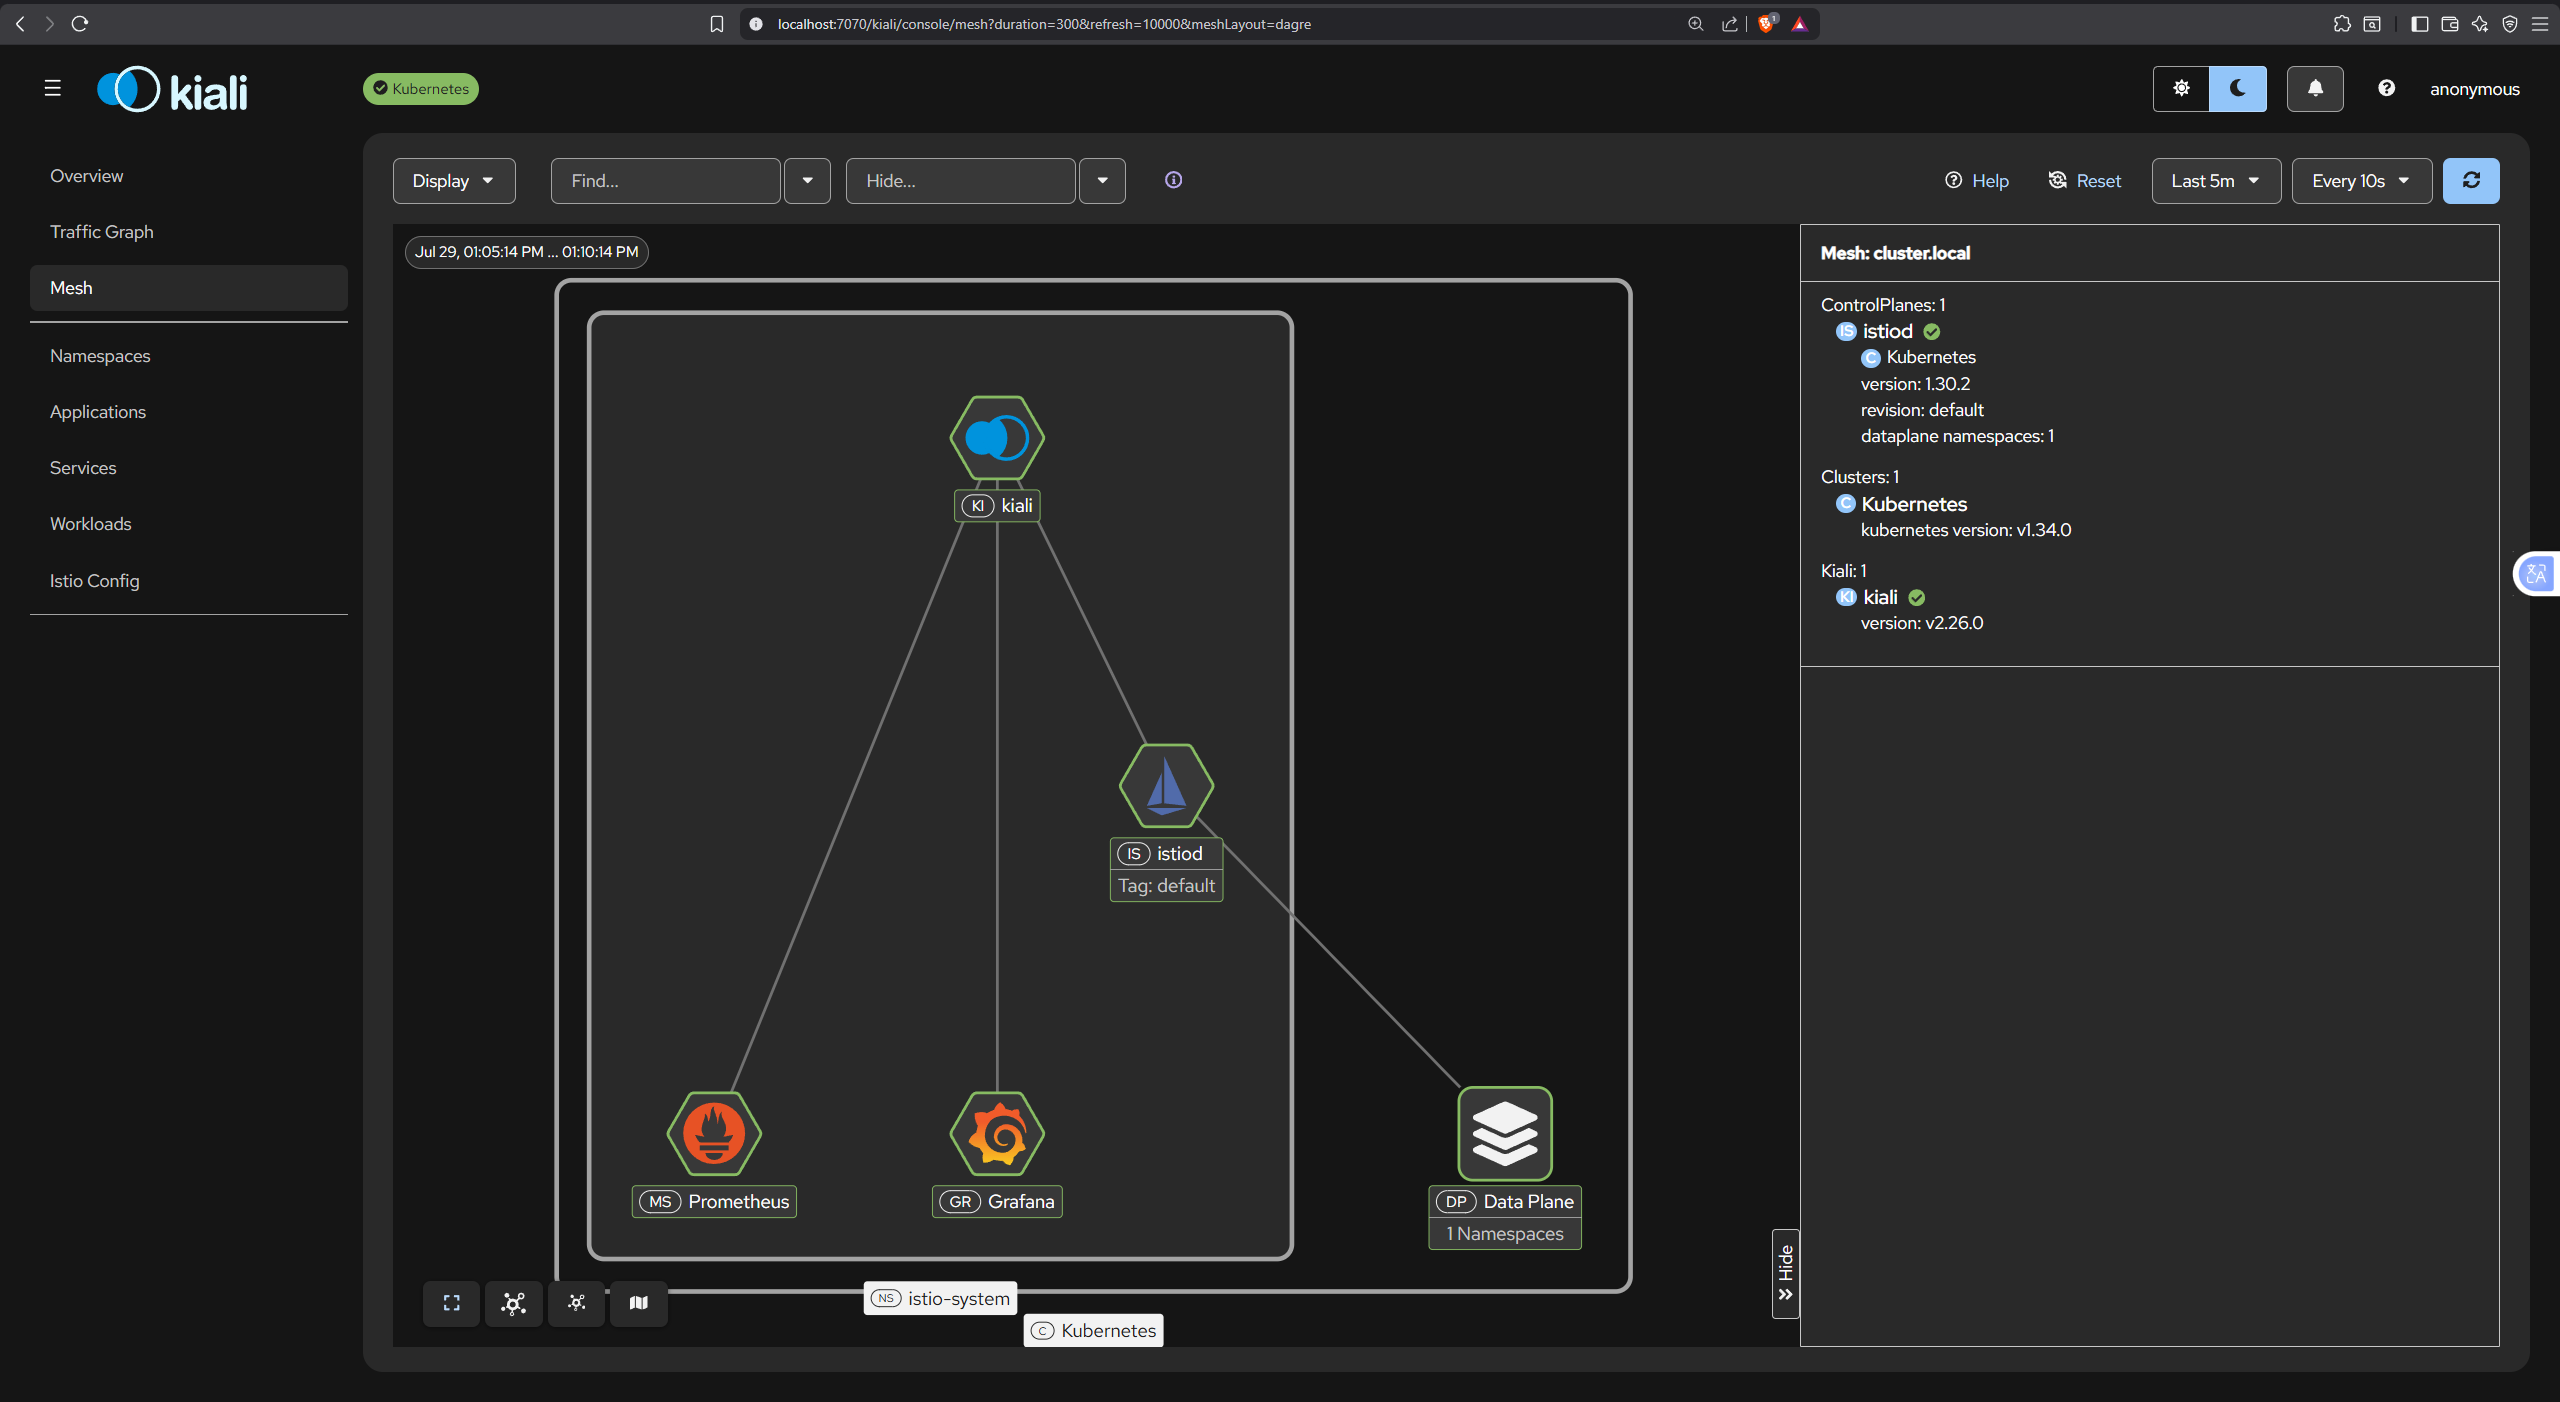
We also have a tab for the mesh, which, unlike the previous one, gives us more of an infrastructure view, showing the components that make up the service mesh. Useful for verifying that the infrastructure is healthy.
5.2 Prometheus + Grafana
Prometheus is a monitoring system that collects and stores numerical metrics over time. In Istio’s context, each Envoy sidecar automatically exposes metrics (latency, number of requests, error rate, bytes transferred) that Prometheus periodically collects without you having to instrument your Go code for any of this.
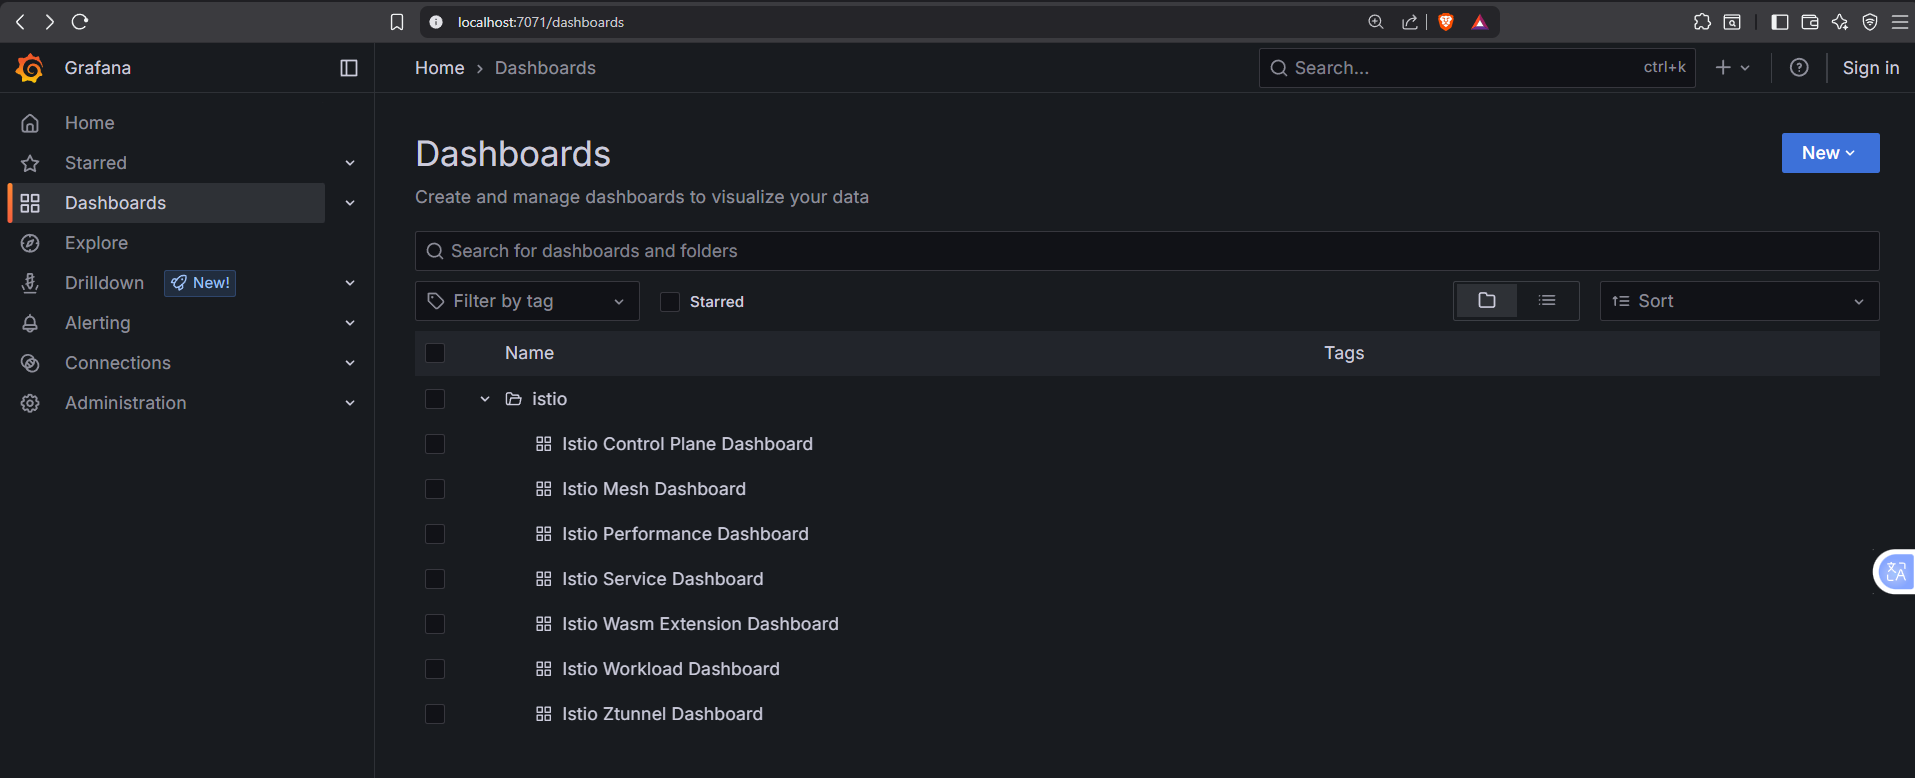
On the other hand, Grafana is the visualization layer, which connects to Prometheus as a data source and lets you build dashboards on top of the collected metrics. In this case, since we installed Istio with the demo profile, it already comes with preconfigured dashboards.
It’s worth mentioning that Kiali, under the hood, also relies on Prometheus to show part of the information we saw in the previous section (such as the traffic data in the Traffic Graph). So, even though we don’t see it directly, we were already using Prometheus indirectly.
As for the preconfigured dashboards, we can see them in the Dashboards tab.
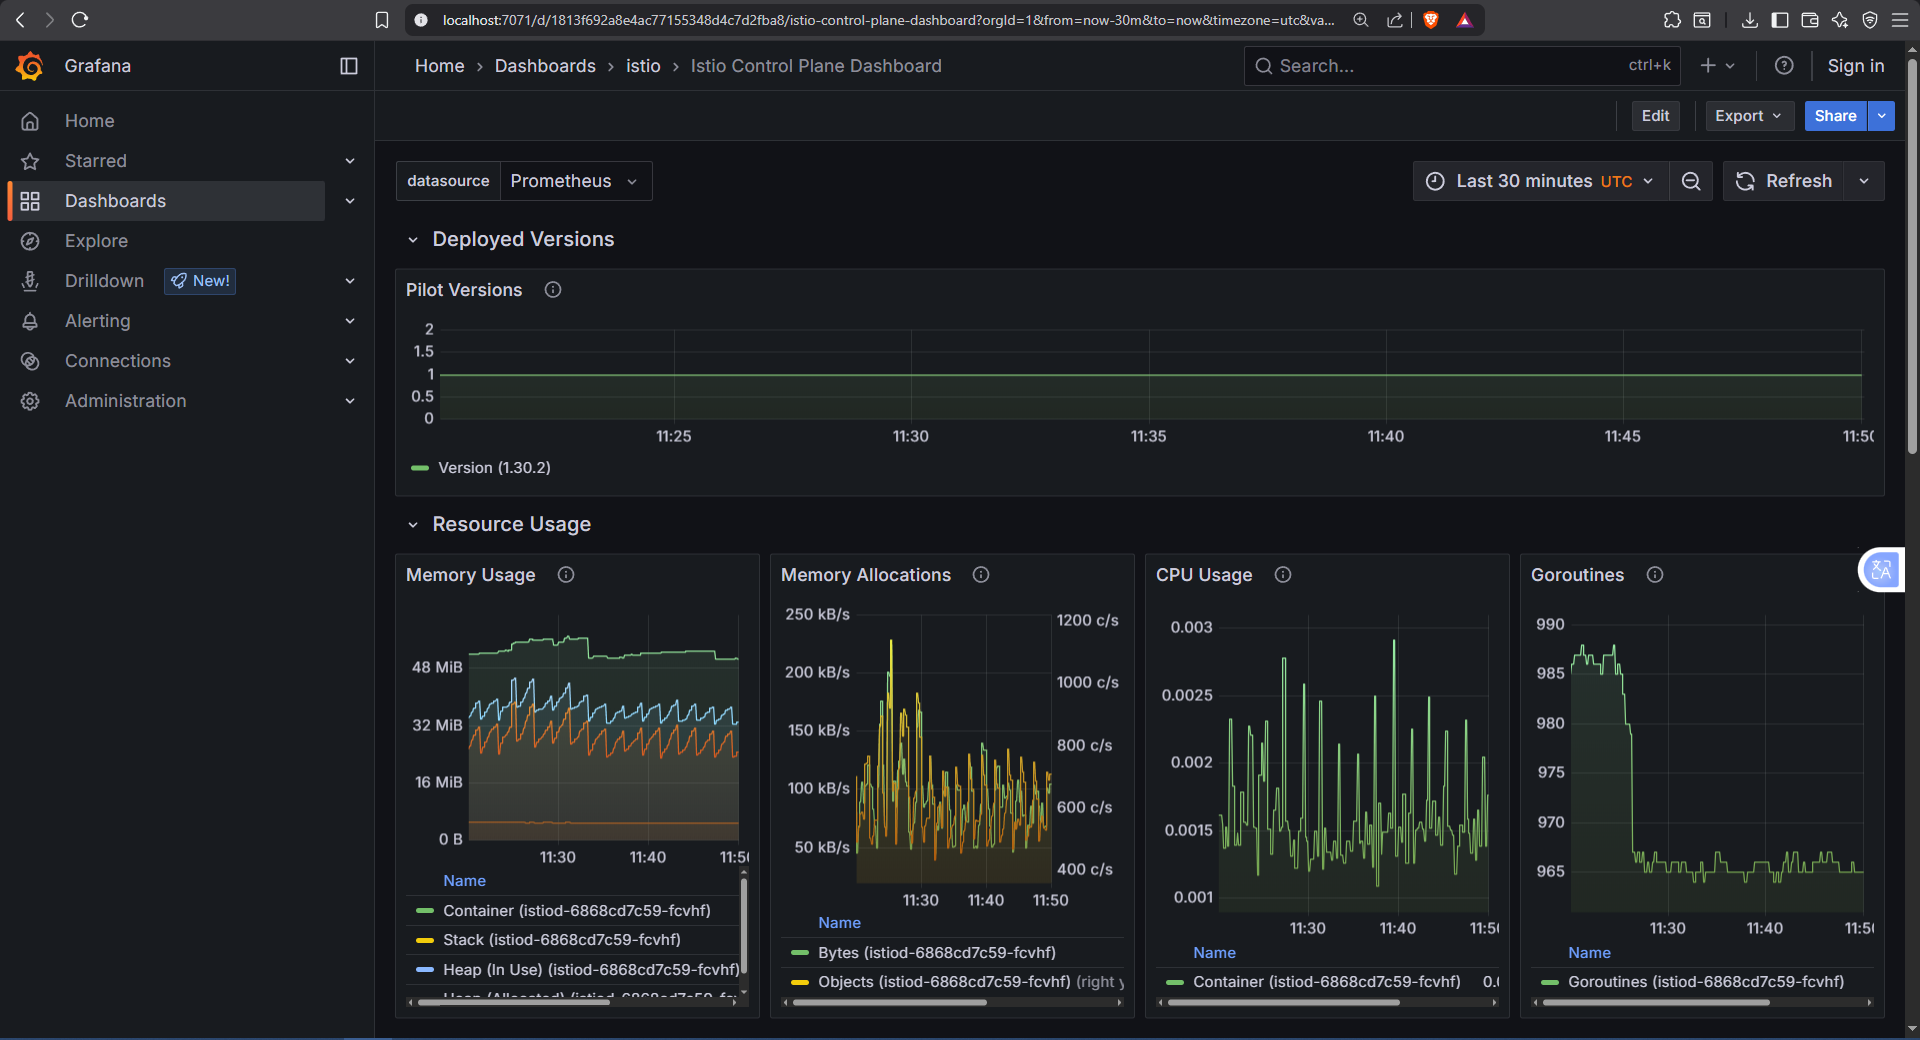
If we open one, for example the Control Plane one, we can see data such as CPU usage, number of Goroutines, memory allocations, among others.
6 Testing
To wrap up, let’s put the full flow to the test: authentication against Keycloak, and calls to the API’s different endpoints through the Istio Ingress Gateway with HTTPS.
The Access Token we extracted from the browser was entered manually as a
Cookieheader, with the same name (AccessToken) our API uses when setting it after login.
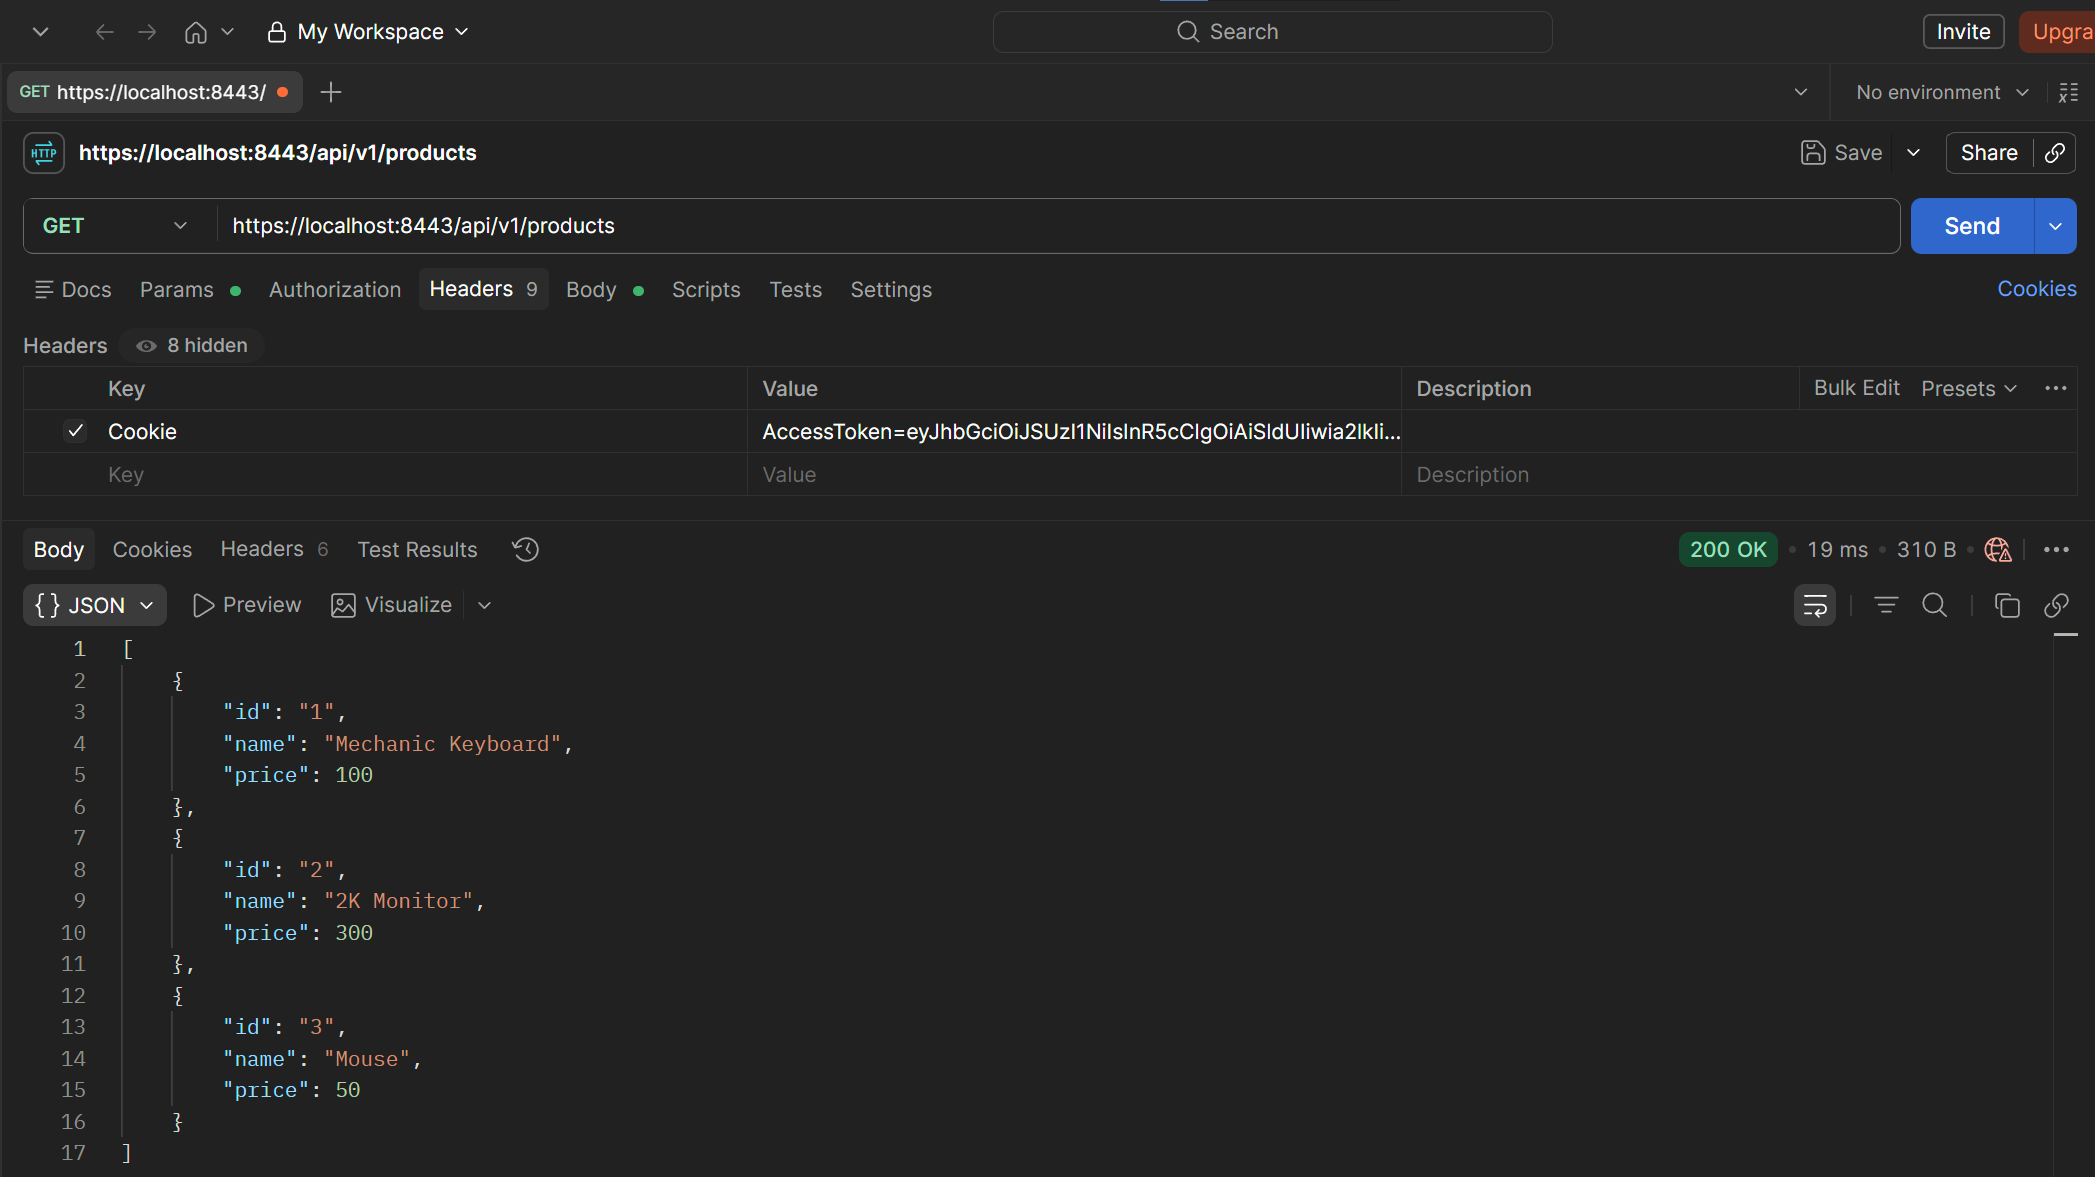
GET of the product list (
/products).
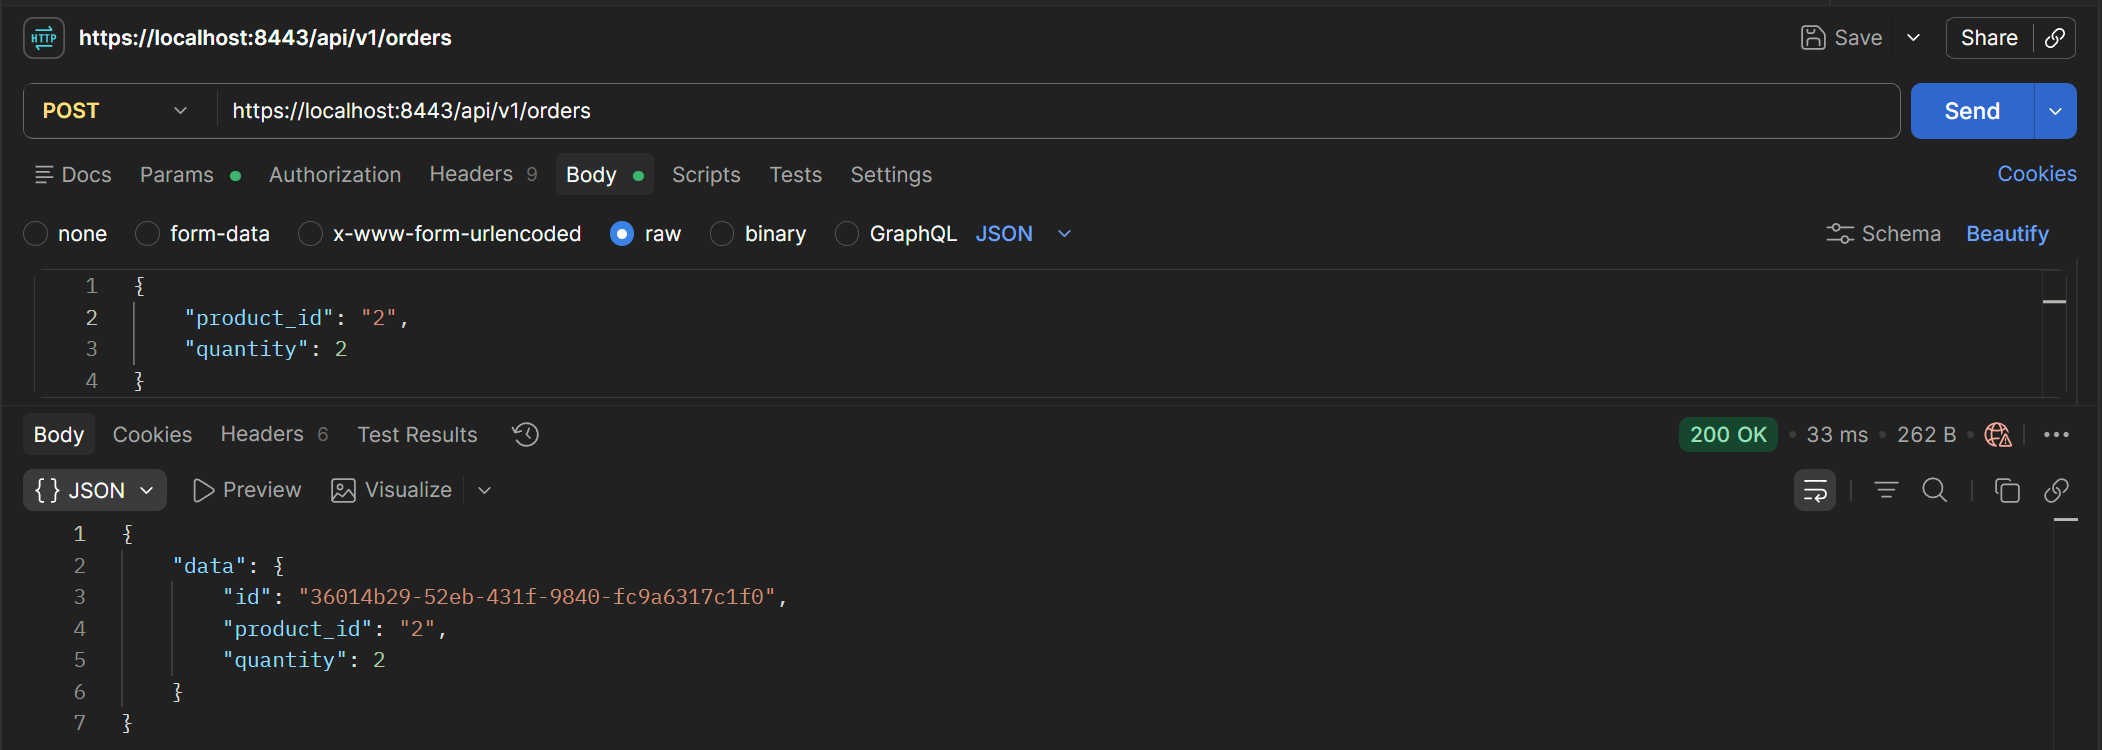
POST of an order (
/orders).
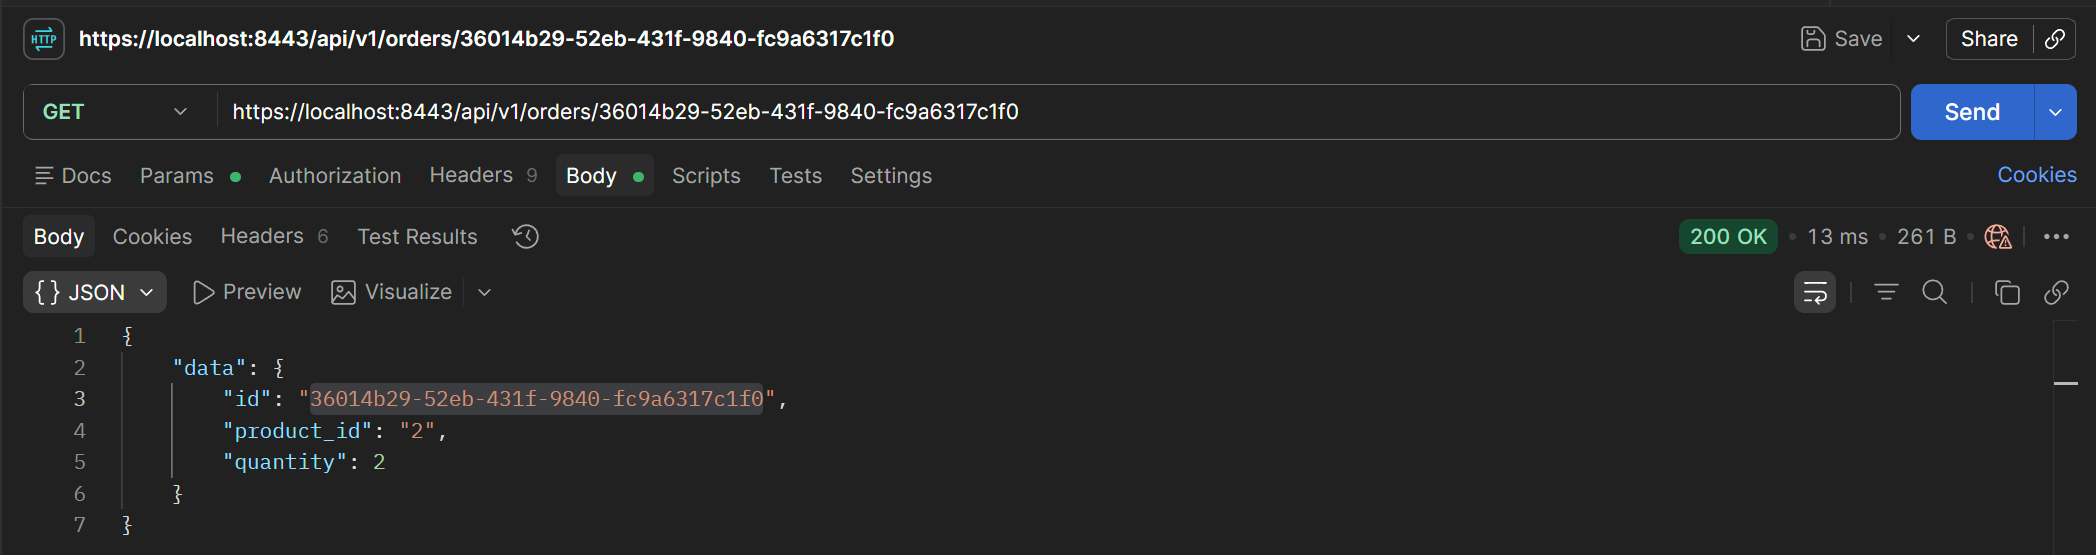
GET of an order by id (
/orders/:id).
7 Conclusions
In this article we’ve learned how to implement HTTPS and mTLS for communication within a microservices-based cloud infrastructure, using a service mesh and decoupling user authentication from our application’s business logic.
With this, we solve the two limitations of my thesis mentioned at the beginning: we no longer manually handle JWT generation, but instead delegate that responsibility to a real IdP, and communication between microservices no longer travels in plain text, but is automatically encrypted and authenticated thanks to Istio.
Some aspects remain out of scope for this project that would make for future iterations, such as using certificates issued by a real authority (instead of self-signed ones), or real data persistence. It would also be interesting to extrapolate this whole deployment to a real production environment, such as a managed cloud cluster (EKS, GKE), with its own domain and valid certificates.
Remember that all the code and manifests used are available in the GitHub repository.
Thanks for reading, see you next time, take care! 👋